For each of the 23 different Game Types, there is a equivalent Author Tool. The Author Tools, like the Games, run in a browser on the Internet. This allow any qualified person to submit Rounds to be added to the EdUGames Database. At the bottom of this page, there will be a link to the Author Tool which we are showing below. You will be able to create Rounds and play them, you will not, however, be able to add them to EdUGames database.
In the below example, the Author is creating a Round that points out several areas of a sail boat and asks which one is the bow. To do this, he first downloads an image of a sailboat and then places various letters over the different areas of the boat.
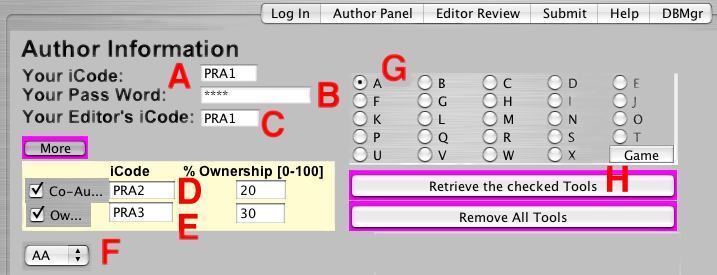
When opening the Authoring Tools in a browser, the first screen show is the "Sign In" screen below. NOTE: An iCode is a person's initials followed by a sequential number assigned to them when they register with EdUGames.
Some items to note:
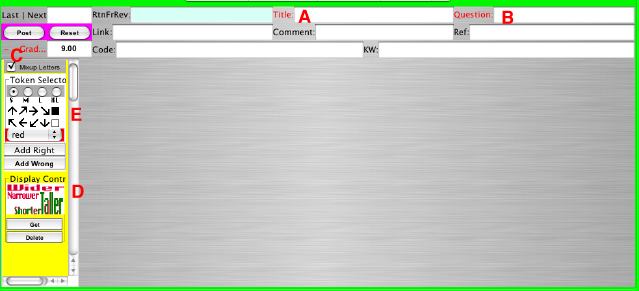
The next screen capture shows a blank Tool A, which was retrieved by pressing the "Retrieve The Checked Tools" button. Some things to note:
The area at the top is common to all Tools. The area below and on the left, is specific to Tools A. The following are required for all Rounds and a Round will not "Post" without them. The title of the Round A, the Question B, and a Grade Level C. We will first show you how to retrieve an image and place various markings on it. The lower part of the screen is specific to Tool A, but the "Image Display Pallet" and "Token Selection Pallet" are used in other Tools. After the image is complete, we will address the text fields at the top of the screen. The test area at the top of the screen is common to all the Tools.
Game A involves the display of a image which had letters on it. The players are challenged to click on the correct letter(s) as directed by the text in the Question field B. To see a detailed example of Game A, Click Here. To stop and actually play some Rounds in Game A, Click Here.
Items to note on Tool A: The "Image Display Control Pallet" D, The "Token Selector Pallet" E, and the "Mix Up Letters" check box C.
In the next Screen Capture, the Get button on the Display Control A has been pressed and the "Image Selection Dialog Box" B has appeared over Tool A. The user has opened the Tree structure on the left side of the dialog box, has selected "SailBoat.KG.gif " C and has pressed the Preview button D.
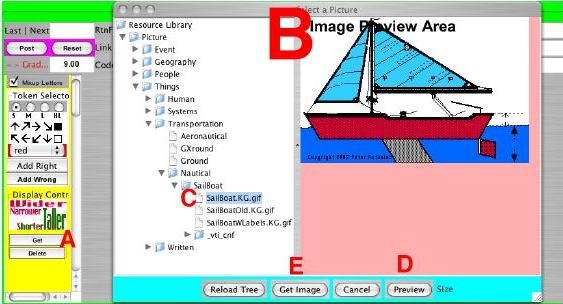
The server has downloaded the image of a sailboat into the preview area on the Right. After insuring that this is the image he wants, he is about to press the "Get Image" button E. which will place the sail boat image into Tool A and hide the "Image Selector Dialog Box B.
In the next Screen Capture, the sailboat image A has been placed into Tool A . The Author can make it larger of smaller by pressing the buttons between B and C on the Image Display Control pallet.
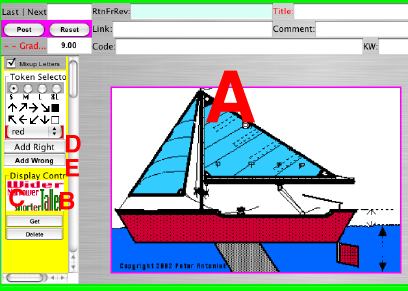
He is about to add some Right "R" and Wrong "W" letters to the image by pressing the "Add Right" D and "Add Wrong" E buttons.
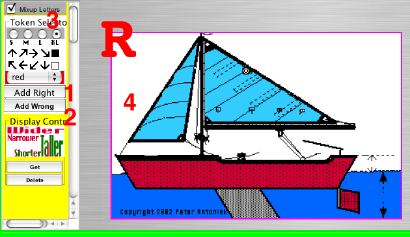
In the next Screen Capture, the Author has selected the "XL" button 3 and then pressed the "Add Right" button 1 and a large letter "R" is placed at the top left of the image area. He is about to use his mouse to move it to where the number 4 is. Note that the color is defaulted to red
In the next Screen Capture, the author has moved the letter "R" to just above the bow of the boat image, he has also pressed the "Add Wrong" 3 button and a large red letter "W" has appeared where the letter "R" used to be.
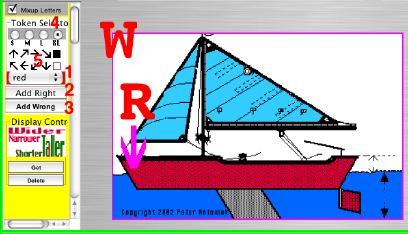
He has changed the color 1 to Magenta and pressed the "down" arrow 5 in the token selector pallet. This placed a downward pointing arrow on the image and he moved it to just under the letter "R" so that it is clear where it is pointing to.
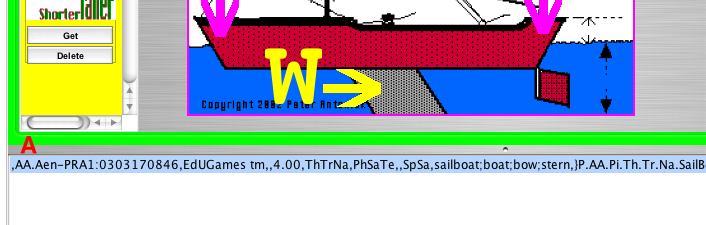
The next Screen Capture shows the final placement of letters and arrows. Note that the Author has control of both the size and the color of all the items placed on the image, as well as the size of the image. As an example, he used the color yellow to make sure that is contrasted with the red of the hull.
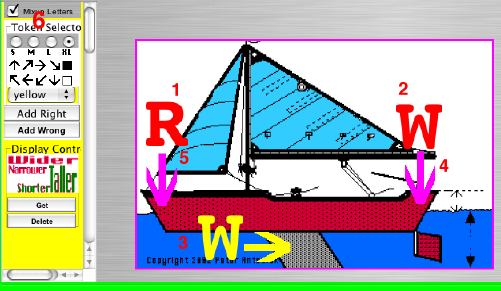
Also note that there can be multiple Right and Wrong letters. When the Round is played, the R's 1 and W's 2, 3 will be replaced with the letters A, B, C... The Mix Up Letters check box 6 is checked, which means that the letters will be mixed up for each game.
Now that we have the image complete, we turn our attention to the text the players will see, along with referencing documentation and sort codes that will help Game Masters select the Round in the Database. In the Screen Capture below, the Author has typed "Boats/Sailboats/Terms" into the title field A . This will place the Round into the Authors area on the EdUGames server into the Folders, "Boats/Sailboats/Terms". He has typed in the Question "Which letter is pointing to the Bow?" in the Question field A. He then pressed the "Ref:" button.

The Reference Dialog D has appeared and the Author is choosing to reference a book called "The New Sailboat Bible" which he has previously registered on the server. . He has selected a template F and has typed in the number 56 D and 3 E to indicate that the reference is on page 45, paragraph 3 of "The New Sailboat Bible".. When he presses the Add button, the code is added to the Ref: Field and the "Referencing Dialog" goes away. The code "^PRA1.TNSB.A.05603' is now in the Ref: field. After the Round is played, users can elect to see the reference and the entire reference, along with all the data that was pre-registered, like the Publisher etc. will appear.
In the screen Capture below, the Author has pressed the "KW" A
[Key Words] and the "Key Word Tool" dialog box has appeared B.
It has taken the words from the Title and Question Field, along with data from
the image and presented the Author with possible words to include. 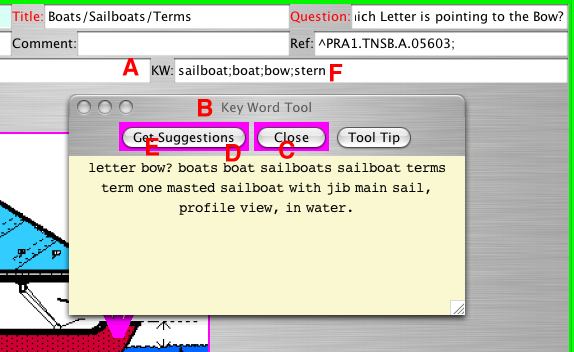
By clicking on the words, they are added to the KW field C, D, E . He has also added the word "stern" F because one of the letters is pointing to the stern. When he is finished he closes the dialog box.
In the next Screen Capture, the Author has clicked on the "Code" tab and the Code screen has appeared. The purpose of the Code screen is to easily add sort and selection codes to the Round so that it can be retrieved from the EdUGames Database by Game Masters in various ways. There are 5 Code types. ACS, Ed, Geo and Triv. The ACS codes A break the world down into "People, Locations, Things, Abstractions and Events. And each major category is further broken down as required. For a detailed explanation of how ASC codes work, Click Here
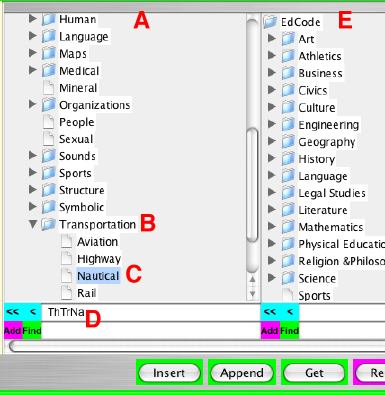
By clicking on a branch of the tree B, C, the corresponding code is placed in the text field at the bottom D. Multiple codes can be added for each code type. In the below example "Things, Transportation, Nautical" was selected and the corresponding code "ThTrNa" is placed in the text field below D.
Continuing with the "Ed" codes A, "Physical Education B, Sailing & Boating C, Terms D " is adds "PhSaTe" E to the Ed text field. Note that we will skip the GeoCode selection tree F because it does not apply to this Round.
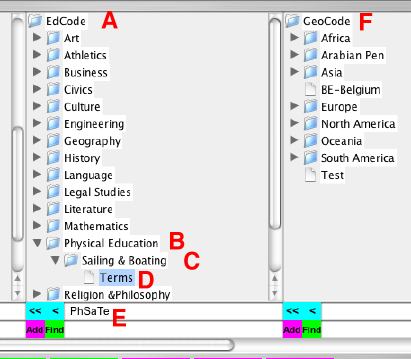
And lastly, we add a Triv code "SpSa" C and press the Forward button to get us back to Tool A.

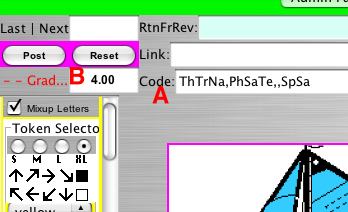
In the next Screen, we are back to Tool A and the codes have been placed into the Code text field A . The Author has adjusted the Grade text field B to 4th grade because in his opinion, this is the level in which a person should know the answer to the question.
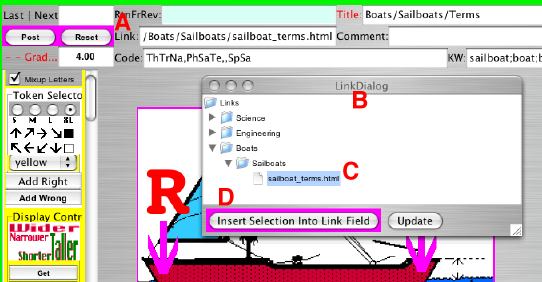
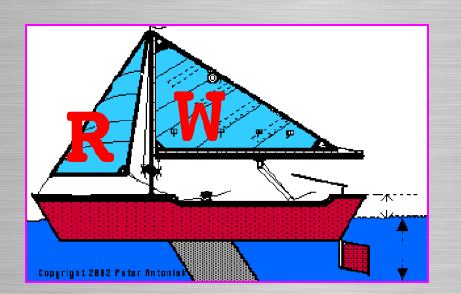
The last optional item remaining is the Link text field. Clicking on the word "Link" A the Link Dialog B has opened and the Author has selected a line in the tree C and the corresponding text has been placed in the Link text field. This link web page will be available to the players at the end of a Round. It contains an image with all the standard sail boat parts. The Author is now ready to press the Post button.
The next Screen shows the area at the bottom of the screen and what appears after the Author has pressed the "Post button. A text description of the Round A is created and added to the list at the bottom of the screen. At this point, the Author can submit the Round to his assigned Editor, or rearrange the letters pose different questions and create more Rounds.
Just to show you what was created, we clicked on the Edit tab and copied the Round up into a text area that explains each field. Things to note: Grade Field A, Code Fields B , Key Words C should be self explanatory.
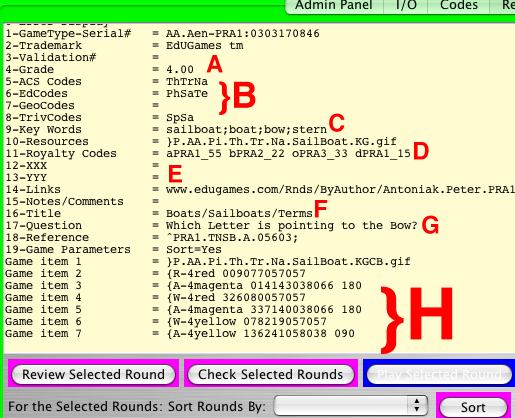
Royalty codes: The program has counted up the complexity of what was done to create the Round and assigned a total Royalty Weighting Unit value of 125, which it has proportioned to the Author, Co-Author, Owner and owner of the sail boat image "dPRA1_15" D. When it is eventually added to the EdUGames Database, the iCodes of the Editorial staff will also be added to it.
Note the web page link E, Title F, Question G, and the location, size and color descriptions of the Letters and Arrows on the image H.
In the next Screen capture, the Author is back to Tool A and is about to ask which sail is the Jib Sail. Note how the letters can be moved, added and deleted.
The above was an example of how to create a Round for Game Type A. It may seem like a lot of work, but it run fairly fast when an Author creates multiple Rounds at the same time because a lot of the References and Code fields do not change. When completed, the Author clicks the Submit tab and uploads the Rounds to the EdUGames server. The server then notifies the assigned Editor with a email and a link. The Editor reviews the submitted Rounds and either returns them for revision, or forwards them to the Classifier who check for consistency of the Key Words and Codes and adds the Rounds to the EdUGames Database. At that point they are available to Game Masters for inclusion into Sets. When they generate revenue, it is apportioned to the various Royalty Weighting Unit holders, which now also includes members of the Editorial and Classifier staff.
For more information on Royalty Weighting Units see The Royalty Model